NOTE

This blog page has moved! I will now be posting updates in https://thingssocool.blogspot.com/

Sunday, December 23, 2018

(WIP) G1 Prototype

That is the name for now since I cannot think of anything better. This is my foray into the growing number of fully-3D printed nerf blasters being produced by modders like me. So, let the blog begin!

This blaster initially stemmed from my original desire to create a brushless nerf blaster much like the FDL2. I originally decided to place the internals inside a rapidstrike shell because I did not want to waste time and filament to produce a blaster from scratch. I originally assembled this into a semi-decent package that worked to a degree. The issue came with the flywheel cage. The original cage I had used in this weapon was based on a 42mm OFP cage. It was designed to fit a set of 2212 brushless motors I had acquired earlier. The performance of these wheels were better than stock, but not by much. Several reddit questions later, and  I deducted that the cage I was currently using was not the best for the job, as the best type of cages were not stock-sized. I later found this article that reinforced what I was already thinking. The answer was clear: I needed a different cage. Using the research that had already been laid down before me by the fantastic efforts of people like torukmakto4 and FDL-1, I began to design a better system for my blaster. I quickly whipped out a prototype cage much like the one described in the above hy-con blog. It had an outer diameter of 50mm, and a complete envelopment of 9.5mm. Everything worked, and it laid the grounds for what I produced below.

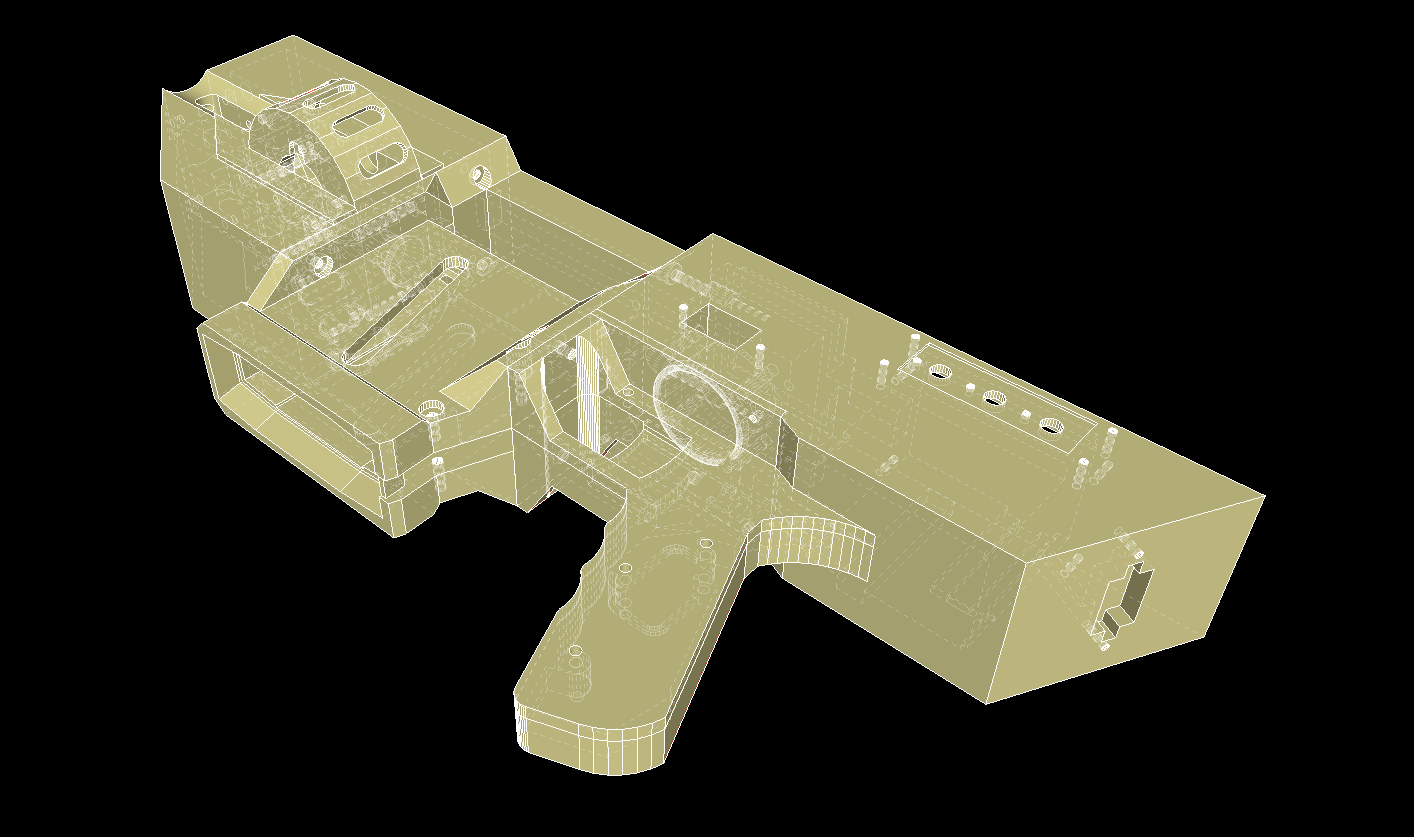
Unlike the previous brushless weapons that were designed to be prototype test beds, I wanted something that actually looked good. Those others were great and all, but the research into weather brushless flywheelers will actually work has already been proven by said weapons, so why continue to make them look boxy and malshapen? I present to you the (work in progress) G1:

I’ll admit, it is not the most form pleasing in this current iteration, but that is OK. I am still developing its finer aesthetic details, but the basic form of the blaster is still present in this cad prototype.


For a test, I printed off this section of the blaster’s handle. It is cut down in every area that is not essential, but it shows the basic principle in which it works.

I will post more developments as they come.

Friday, December 14, 2018

Early Mods

-note-
Images will be added soon

These are some of my initial modifications. I feel like these are necessary to share, but do not deserve to have an entire blog each.

My first flywheel nerf blaster that I had ever received was the Buzzbee Rapid Blast. It existed around the time of the barricade and dates back to 2010. The weapon never got used much by me, however, because poor design on behalf of Buzzbee rendered the gun unusable to all types of darts except their yellow and purple suckers. Even then, the blaster jammed quite much and was too impractical to use. For that reason it sat, collecting dust, in the back of my closet until just a short time ago. I broke it out one day, wondering “It would be a pity to let this go to waste, why not mod it?”
 And mod it I did, using what limited resources I had at the time, I used a Dremel to grind off the extra length of the lip that shrouded the flywheels. This allowed non-Buzzbee specific darts to be shot from the blaster and increased reliability tenfold. Although the weapon was more reliable, the range left something to be desired, so I inserted some old barricade flywheels into the blaster (this was because that was all I had at my disposal). This was possible because of the unique design of the cage. Instead of completely surrounding the flywheels, it more resembled a platform, holding the flywheels on one side without any sides, rails, or constraints. 

Soon another issue surfaced. The rapid blast was missing any sort of protective barrier on the underside of the flywheels (see picture), so any misguided darts would find themselves within the shell below the cage. To remedy this, I took an old payment card, chopped it to fit the outline of the shell, and glued it in place. 

I had the blaster powered with some Li-Ions, as they provide a quick, drop-in boost of power I am not proud to say that, but they worked adequately for me at the time. (this is because Li-Ion batteries (as well as other types like IMRs) are heavily frowned upon as a “mod” in the nerf community, as their output current cannot handle anything beyond stock motors. Be warned!)I have since moved on to other blasters, so this one hasn’t gotten much attention from me since.

My next more professionally made blaster was this Rapid Red (or as I like to call it, the Rapid Blue). I have a good friend who graciously donated this to me after he ran out of time to finish it. As you can see, he got around to painting it before  I received it. For that reason, it is not quite my painting style (you can see my style in later projects), although this blaster much defined my loadout paint scheme in later builds.

The first thing I did was print off a 42mm OFP cage. I already had easy access to a 3D printer then, (now it’s two) so I cranked one out and dropped it in. The second thing I did to this weapon is drop in some meishel 2.0 motors. They had just been released when I was doing this, so I had decided to try them out in this blaster. The final thing I did to this blaster was give it a complete rewire. Stock wires are hair-thin and don’t cut the standards for almost any sort of modification, so I replaced them with some nice, thick wire.  The result is what you now see here. 

You can see the 3D printed battery door I have added onto the front to the blaster. That is because I lost the original quite some time ago.
Edit: oops! I also seemed to have lost the 3D printed one as well! How ironic.


I will have chronograph data on these two builds soon.


Wednesday, December 12, 2018

Intro Post: Now what is this all about?

Hello, I am Dr. Glaucous.
This is my first blog post based on this subject, which is about nerf related things. Everybody has to start somewhere, and this is where I shall start:

I have been in the 3D printing community for, as of now, over 5 years, and recently uncovered the nerfing community (about 1 year ago). This community, to those who may be unfamiliar, specializes in acquiring and modifying the beloved children’s toy to shoot harder, faster, and more straight. Recently, as 3D printing progressed, many of the nerfing community have acquired and used these machines in their builds, and for good reason, too. It provides an easy and useful way to make parts to enhance the build’s performance in new ways. 
 
I was already waist deep with all the necessary skills required to produce effective results (I.E soldering, CAD, mechanics, etc), and I even had prior experience with RC vehicles (I knew how to safely use LiPo batteries), so this hobby seemed like a good fit for me. 
I was initially introduced to this community by a good friend who was already himself well acquainted with the processes and requirements. This way, I didn’t start on ground zero when I jumped in. In fact, my first weapon modification was made on an old Rapid Red that he gave to me. I started out with a simple rewire, set of Meishel 2.0s and a 42mm OFP cage. I was well impressed with the result, and set out to produce more modified blasters (another thing I was quite thankful of learning about before joining the community is that it is absolutely essential to refer to your weapon as a “blaster” and to never call it a gun).

In this blog, I will document my experiences with these modifications for others to read and learn from. I will try not to repost content from other sites, and I shall do my best to keep this blog as useful as possible (I.E less rambling garbage and more useful content, although, in my opinion, certain types of rambling garbage makes for a pretty good read).
 
 
I chose the name THWACK for my blog simply because it is unique. Most other nerf blogs go by Nerf[insert descriptor here]. That seemed a little too generic for me, so I chose the the word that reminded me of the relatively classic sucker dart hitting-and sticking to a smooth surface -thwack.